For someone who really believes in using quality tools, I buy far too many cheap ones. Case in point: I just bought a 6000-count Tilswall FY8233X multimeter from Amazon for the amazingly low price of $6.99. That’s right, I bought a multimeter with test leads, a carrying case, and batteries for less than the cost of a Burger King Whopper Meal Combo for two deal. Unlike the Whopper Meals, the multimeter has a 90-day replacement warranty.
It’s not like I needed another multimeter. My old standby is a rugged and reliable Fluke 77 that I got in a trade back in 1985. Fluke introduced the original Model 77 meter in 1983, and my copy still works as well as ever. I’ve also got more than a dozen 2½-digit Centech multimeters from Harbor Freight just because they were free with a coupon. I’d pick up a free meter every other visit or so. These free meters are great for monitoring several voltages at the same time, as long as you’re not too picky about resolution or accuracy. However, Harbor Freight no longer offers these meters as free premiums. Don’t bother paying for one.
About four years ago, I bought a 20,000-count Surpeer AV4 multimeter from Amazon for $36.99 and tested it against a lab-grade Agilent 34401A multimeter. The readings were so close as to call the measurement competition a tie. That’s not to say they are equivalent meters. Far from it. I’m pointing out that you can get reasonably accurate readings from some low-cost instruments. Just don’t expect them to be rugged or stay in calibration over time like a name-brand meter.
If you have never heard of Tilswall or Surpeer instruments, that’s not surprising. They’re just two of hundreds of fleeting Chinese name brands carried by online retailers like Amazon.
When she found out about my purchase, my wife asked me why I needed another cheap multimeter, given the pile of free Harbor Freight meters I had accumulated.
I blame the Bear.
The Bear is a motion-capture animated, cigar-chomping, ursine avatar belonging to Jeff King, who appears as the emcee on the “Den of Tools” YouTube channel. Among his many weekly tool-oriented video segments, King, through the Bear, runs a “Hot Tool Deals of the Week!” segment each Monday. These videos generally cover tool sales from major tool retailers such as Lowe’s, Home Depot, and Amazon, and direct deals from tool makers such as SK Tools, Grizzly, and Tekton. Usually, you’ll see ratchets, sockets, and mechanics’ hand tool sets; battery-powered tools such as drills, impact wrenches, saws, and grinders; garden power tools like hedge trimmers and lawn mowers; and outdoor grills in these weekly video segments. Multimeters are not usually on the Bear’s weekly bill of fare.
But one recent Monday in July, the Bear discussed two tools for electronics work on sale at Amazon: a variable-temperature soldering station and a multimeter, both branded “Tilswall.” With coupon codes from the Bear, the soldering station was $23.99, marked down from $39.99, and the multimeter was $6.99, marked down from $19.99. Coincidentally, $6.99 is currently the retail price for the 2½-digit Harbor Freight meter. (Again, I advise you not to get one.)
How good could a $6.99 Tilswall multimeter be? I’ve disassembled the Harbor Freight meters, and their construction is crude at best. The Tilswall meter looked to be of much better quality, at least in the online photos. For seven bucks, I could not resist finding out.
I ordered the Tilswall multimeter, and it arrived two days later with free Amazon Prime shipping and a smidge of tax for Governor Newsom’s coffers. I arrange for all of my Amazon purchases to be delivered across the street at the corner Amazon store to avoid porch pirates, which now sail the streets of San Jose in depressingly large numbers. My packages stay safe, and I get an excuse to venture out. Amazon-induced adventures like this make sheltering at home during the COVID-19 pandemic at least “bearable.” Pun intended.
Let’s take a look at the cardboard packing box enclosing the Tilswall multimeter:
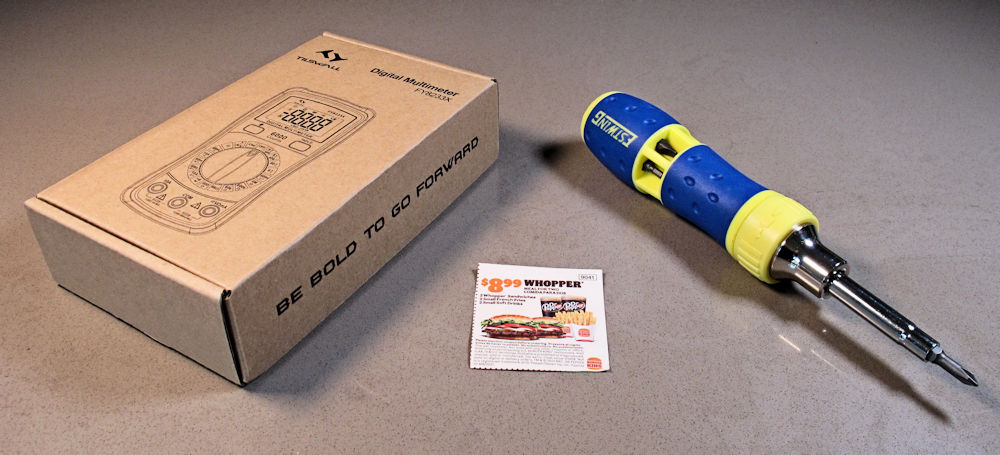
Even before opening the box, we get an oblique Star Trek reference printed on the end flap: “Be Bold to Go Forward.” Close enough to “To boldly go where no one has gone before.” You gotta love a cheap multimeter with big aspirations. For comparison, the photo above also shows a coupon for two Burger King Whopper Combo Meals for $8.99 and an Estwing 19-in-1 ratcheting screwdriver, purchased on sale from Lowe’s for $11.98 on the same day that I ordered the meter, again thanks to the Bear. These two items are in the picture for contrast. The screwdriver and the meal deal each cost more than the Tilswall meter.
Here’s a photo of the Tilswall FY8233X multimeter:
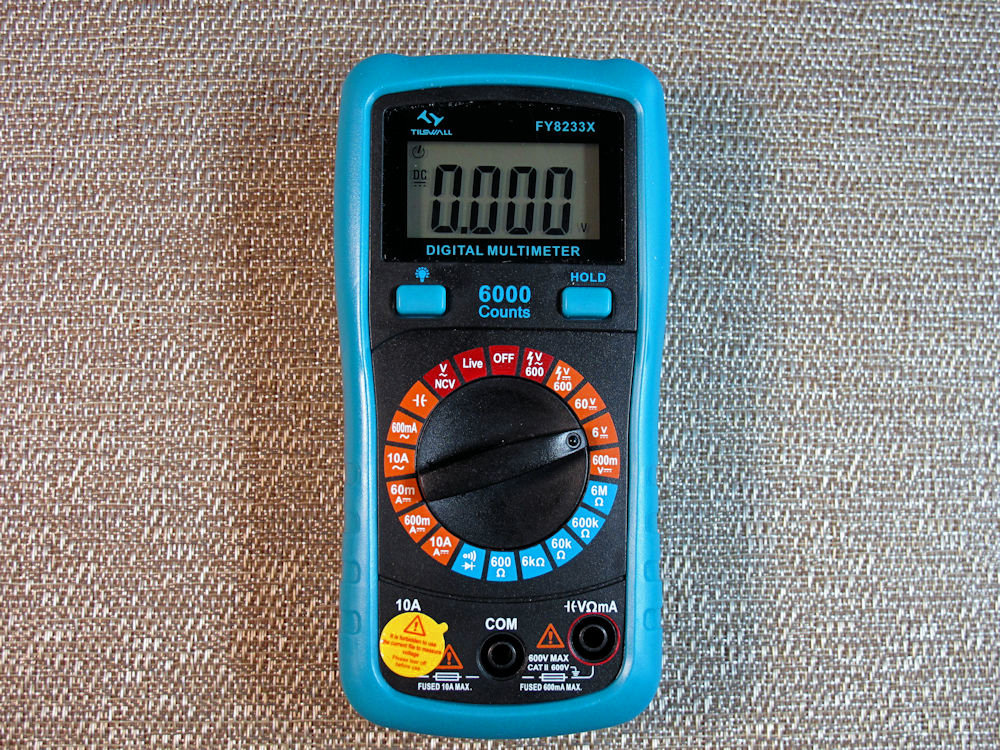
This is a surprisingly attractive instrument with its teal-colored protective rubberized bumper shell wrapping the meter’s case. Teal is the San Jose Sharks’s professional hockey team color, so we see a lot of that color around town. The meter’s controls are nicely laid out, although the markings around the rotary dial are fairly small. If you need reading glasses, you’ll want to use them for the small print on the Tilswall’s dial.
You make all instrument settings with the 20-position rotary dial, with the exception of the Hold button, which freezes the display, and the backlight button. The dial uses color-coded sectors to divide the meter settings into dc volts; ohms, continuity, and diode test; ac and dc amps and capacitance; and the one-off ranges, including the lone ac volts setting (600V full scale), NCV (non-contact voltage sensing), Live, and Off. The Tilswall is my first meter with NCV sensing. That’s probably worth seven bucks alone.
The meter needs a 20-position dial because it’s not an autoranging meter, so the instrument needs several ranges for each type of measurement. You must pick the right range manually. The hold button is potentially a nice feature if you’re unable to look at the display while taking a reading or if you need to walk the meter to a desk to record a reading. However, you possibly need three hands to make the hold button work: two hands for holding the test probes and an extra hand to press the hold button.
You might ask, “What is the ‘Live’ setting?” The manual says it’s a “live wire” test. Plug the red lead into the meter’s input voltage jack; put the other end of the probe into an electrical outlet; and the meter will beep repetitively if the circuit is energized. I guess this is a somewhat safer way to check an electrical outlet instead of poking both test probes into a live socket. There’s no second test probe to carry the voltage to your other hand and give you an accidental shock. It’s never been a problem for me, but at the same time I can’t truthfully say that a live electrical outlet never “bit” me while I was daydreaming.
The Tilswall is roughly 25 percent smaller and much lighter than my Fluke 77 multimeter. Although the Fluke’s display window is significantly larger than the Tillswall’s, the actual digits in the Tilswall’s display are larger and easier to read than the Fluke’s. The Tilswall’s backlight button is a very nice feature for working in dim light. My Fluke meter lacks a backlight, but it’s nearly 40 years old. The Surpeer has a similar backlight driven by one white LED, but the Tilswall’s backlighting is far more even. For a small meter, the Tilswall meter has a surprisingly nice display, but the thin, clear plastic display cover is cheap and flimsy. It flexes if you press it lightly. Given that, I’m not optimistic about the display’s ruggedness.
An “auto-off” feature shuts down the Tilswall meter after about 20 minutes of inactivity. I was surprised to find that my meter had switched itself off half an hour after making some measurements. That’s how I learned about this feature. You can disable this feature when switching the meter on.
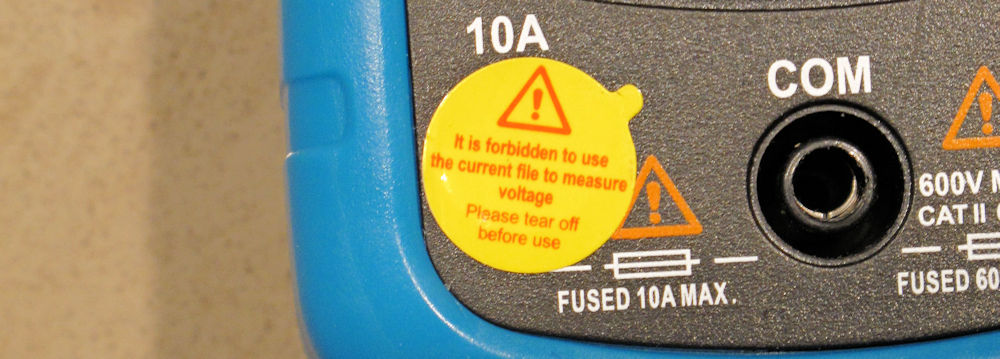
Take a look at the lower left corner of the meter in the above photo, You’ll see a round, yellow sticker covering the meter’s 10A input jack and stating: “It is forbidden to use the current file to measure voltage.” A closeup photo of the sticker appears below. It’s not a mattress tag that you cannot legally remove. This language is simply a somewhat amusingly translated warning not to use the 10A input jack when measuring voltage. Both of the Tilswall’s input jacks are appropriately fused for making current measurements.
Tilswall supplied fully shrouded test leads with the meter, and they’re not bad. They have molded strain reliefs and removable plastic probe caps that expose just the test probe tips when they’re in place. These caps help to prevent inadvertent shorts when probing around crowded circuitry. They’re a nice detail, but you need to remove the caps to make electrical contact when sticking the probes into a deep connector or electrical outlet. The lightly padded carrying case supplied with the meter is also a nice touch for such an inexpensive piece of test gear.
So much for the meter’s external appearance. Let’s open this puppy up and see how well it’s built. The cushioned bumper pulls off with some difficulty. It’s not really meant to be removed, and mine stretched a bit during removal, so it no longer holds as tightly as it did before I removed it. With the bumper off, you can see two tiny, deeply recessed screws on the back at the bottom of the meter. The screws hold the two case halves together. The top of the meter is snapped together with two plastic clips molded into the case. Take out the two bottom screws and you can lever the case open.
Here’s a photo of the inside of the Tilswall meter:
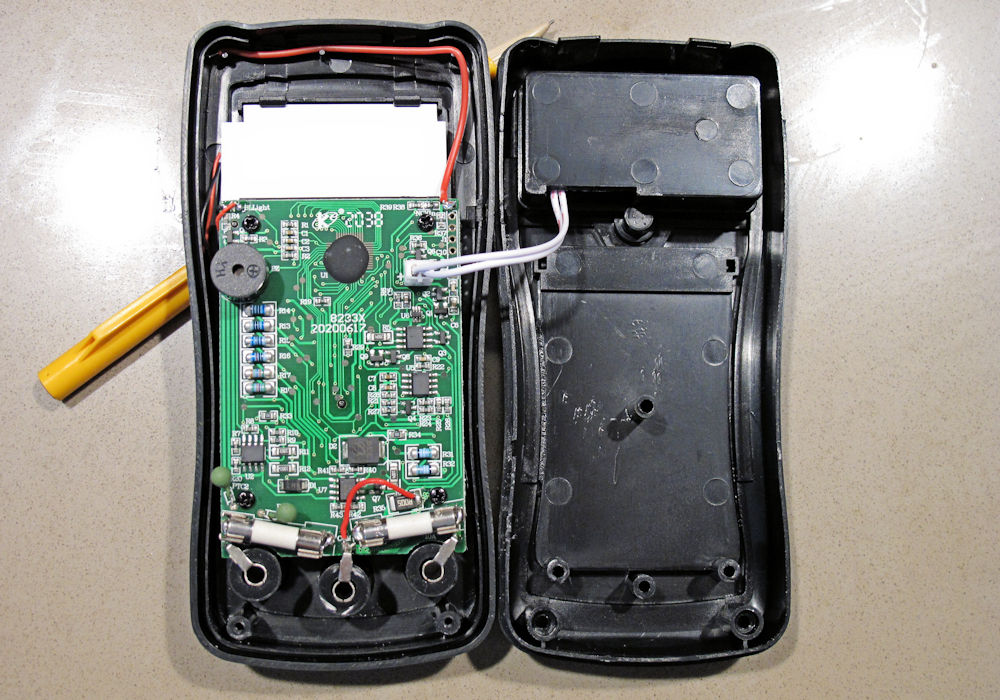
Well, this is a surprise. The Tilswall appears to be a nicely laid out and well executed meter. The circuit board is tidy and covered with surface-mount parts, except for the multimeter chip located at the top of the board under a blob of epoxy. That’s chip-on-board technology; it’s been around since cheap desk calculators started using this technology back in the 1970s. The red wire running across the top of the meter is the antenna for the NCV measurement. The red/black twisted wire pair at the top left supply power to the LED backlight.
You can see the two fuses that serve as overcurrent protection for current measurements mounted at strange angles near the bottom of the circuit board. A couple of green PTC thermistors sit just above the leftmost fuse. The PTC thermistors provide additional input protection. It’s a welcome surprise to see extra-cost protection like these PTC thermistors in a low-end meter.
A 2-wire cable connects the battery box to the board through a 2-piece battery connector. The battery box holds a pair of AAA batteries in an actual molded plastic battery holder. It would have been somewhat cheaper to mold the battery holder directly into the case, slip in some battery clips, and solder a pair of wires between the battery clips and the circuit board. I suppose the existing design might allow other meters based on the same case parts to use a 9V battery instead of the AAA battery pair used in this meter.
Tilswall supplied a pair of really cheap carbon-zinc AAA batteries with the meter. They’re so light in weight, I wonder how long they’ll last. I guess they’re better than no batteries at all. I’ll just need to remember to change them out before they leak. A small screw holds the external battery cover in place. This screw fits into a threaded metal insert, which is yet another extra-cost item that’s surprising to see in such a low-end instrument.
So much for its external and internal beauty. How well does this meter work? I gathered some random electronic components from my junk box (batteries, resistors, capacitors, and a 1N4001 silicon diode) to exercise some of the meter’s ranges. I did not conduct exhaustive tests because I didn’t plan on fully characterizing this cheap meter. I just wanted to see what it could do.
Now I don’t have a metrology lab set up in my condo but I do have a few digital multimeters, so I made some relative measurements to see how the Tilswall meter stacks up against the Surpeer AV4 and the Fluke 77. I think the results are adequate to judge the performance of the Tilswall meter.
Here are all the results in table form:

First, I tried the resistance ranges. There are two resistance readings for the 2K trimmer pot in the Tilswall’s resistance results column because the Tilswall meter had two applicable ranges for this measurement value. Because the Tilswall meter is not an autoranging meter, I measured the resistance between the trimmer pot’s end terminals using both applicable resistance ranges. The Tilswall’s measurements for the same component were 2.20KΩ and 2.12KΩ on the 6KΩ and 60KΩ ranges respectively. That’s a surprisingly large difference for the same component, which the other two meters measure at approximately 2.21KΩ.
The Tilswall’s two measurements for the same resistor using the two resistance ranges differ by nearly 4 percent, and they’re both low relative to the other two meters’ readings. The Tilswall’s accuracy rating for both resistance ranges is ± (0.8 percent of reading + 2 counts) so, worst case, the two readings could differ from each other by perhaps as much as 36Ω, but the observed difference is more than double that amount.
Next, I tested three capacitors. Truthfully, I cannot remember wanting to test a capacitor using a multimeter in the last 50 years. My old Fluke 77 meter lacks a capacitance range, so it couldn’t play this inning. The Tilswall and the Surpeer capacitance measurements shown in the table above are close enough to satisfy me that the results from both meters are probably realistic.
The diode measurements give the approximate forward voltage for the 1N4001 diode. A diode’s forward voltage depends on the amount of current the meter injects into the diode during measurement, so the widely differing values from the three meters are not surprising and should be expected.
Finally made the dc voltage measurements on a couple of batteries. Here, the Tilswall had a problem. It’s not sufficient to measure dc voltage using just one polarity when testing a meter. You want to see if the meter reads the same voltage value when you swap the polarity of the test leads. From the table, you can see that the Tilswall does not give the same readings for both polarities. It exhibited about 3 to 4 mV of dc offset voltage when measuring the 1.2V NiMH battery and about ten times that offset amount on the next higher range when testing the 9V Lithium battery. The root of this problem likely sits under that blob of epoxy on the meter’s circuit board. The Fluke 77 exhibits no dc offset error, and the Surpeer exhibits a slight offset on a lower voltage range but no offset for higher voltage readings.
The different resistance measurements on the 2K pot and the dc voltage offset errors strongly suggest that the Tilswall meter is closer to a toy than a tool. It might be fine for your car’s glove box or trunk if you just want something to read battery voltages or to check for opens and shorts, but it’s not a professional-grade tool (I hardly expected it to be), and it doesn’t belong on your lab bench despite its good looks and construction.
Actually, you can no longer buy the Tilswall FY8233X meter from Amazon anyway. The listing shows that the meter is sold out and there’s no forecast as to when (or if) they’ll return to stock. This is typical of these off brands. The Surpeer meter’s long gone too. I Googled the Tilswall meter’s model number and found what looks to be another version of this meter with more modern styling listed on Ali Express for $14. However, I strongly suggest you spend a little more money to buy a meter you can trust. It’ll be worth it.
I do encourage you to buy some of these low-cost electronic products that flood Amazon and similar vendors to study them. I’ve certainly found them interesting and, in some cases, such as an inexpensive contactless IR thermometer and an optical tachometer, they’ve proved to be quite useful. Sometimes, it’s amazing what a few dollars will buy. Other times, like this time, it’s not.
Do you have a favorite meter to recommend? Feel free to tell everyone what it is and why you like it in the comments below.
Leave a Reply
You must be logged in to post a comment.